Tips for Photographing Spirals
Posted: 06/25/2024
This article is based on concepts from The Advanced Photography Action Cards which are currently 71% off if you want to check them out.
In numerous areas of study, many theories examine why the spiral shape is so darn fascinating to us.
Photo by Yifei Chen
The use of spiral shapes in architecture and art dates back almost to the beginning of human existence.
It’s true. We’ve had a long love affair with the spiral!
Most of us are spending a lot of time at home these days. We may not currently have the opportunity to photograph a gorgeous architectural spiral, such as this museum staircase.
But that doesn’t mean we can’t go on the hunt for less obvious spiral subjects to photograph. You likely have numerous spirals near you at this very moment.
Photo by Rollstein
The spiral can be found in everything from galaxies to snail shells.
In ancient history the spiral was considered a symbol of prosperity as it represented the growth of a vine. (I guess the ancients liked their wine too!)
Today I’ll guide you along on a photo safari to seek out and photograph spirals right in the comfort of your own home.
Photo by ulleo
Let’s Start by Finding Spirals in the Kitchen
Many food-related items contain a spiral. Pasta is a great example.
Photo by adamkontor
Or how about some cinnamon rolls?
For this spiral project, follow these steps.
- Gather food items that are spirals by nature.
- Gather food items that you could twist into a spiral for something more abstract.
- Scrounge through your cooking utensils. I bet you have a spiral or two in there somewhere (perhaps a corkscrew)!
Push a table near a window. Also gather a couple of other light sources. Select sources that have different types of lighting – a table lamp that provides broad even light could be one source, and a powerful flashlight that creates a spotlight effect could be another. The idea is to create different types of lighting.
Now build your set. You could use simple art paper for a plain background. You could also use a clear glass container to create water effects, such as the pasta photo above. Alternatively, you could create a table setting. In the end, your set building is limited only by your imagination.
Now Let’s Find some Spirals in Other Parts of the House
Idea: Take a look at some of the toys that you may have lying around. A Slinky is one example, but there are lots of toys that incorporate a spiral design.
Photo by CWilkinson
Lighting: When photographing a spiral, you don’t want to use flat frontal lighting. You want to use lighting that comes from the side or the rear. These directions of light accentuate the shape, which is essential when capturing pictures of a spiral.
If you find that you’re scratching your head in search of spirals around the home, let me share with you how easy it can be.
Let’s Search for spirals in the Garage and Basement
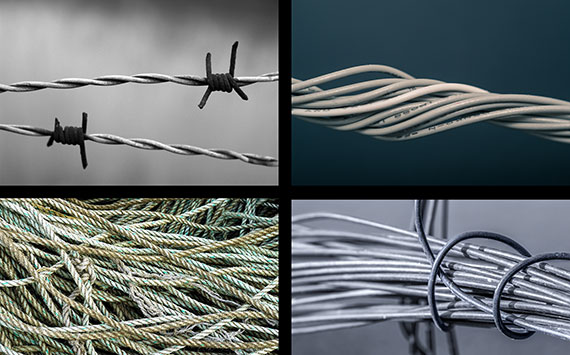
Top left photo by CarlottaSilvestrini, Top right photo by Steve Johnson, Bottom left photo by MikesPhotos, Bottom right photo by analogicus
Idea: While engaging in your spiral photo safari, don’t just think, “I’m looking for a spiral.” Remember, you can also create a spiral. Two of the images above were found spirals, and two were created spirals.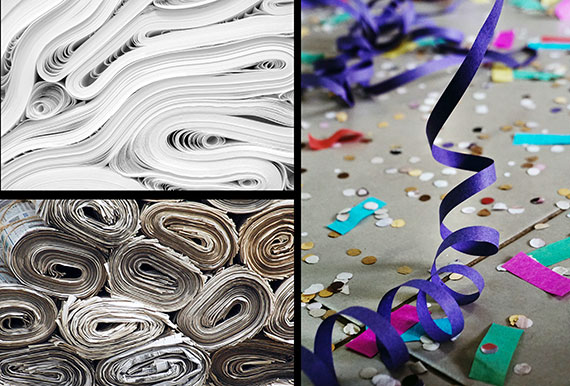
Top left photo by JJ Ying, Bottom left photo by Jen Theodore, Right photo by Matheus Frade
How About Checking the Home Office for Spirals
Idea: Paper is an excellent resource for spiral photography. It can easily be molded and shaped into different types of spirals. Remember, you can combine the spiral with other shapes for different effects! You can also combine different spirals made from different materials for exciting juxtaposition.
Photo by MabelAmber
Key Thought: A spiral is a shape. A shape is a powerful tool of composition when repeated in a photograph. From a composition point of view, a repetitive form is at its strongest when you introduce an interruption. The picture of the rope depicts how an interruption in flow creates drama. The disruption becomes a focal point to the subject, which is a rope with a spiral!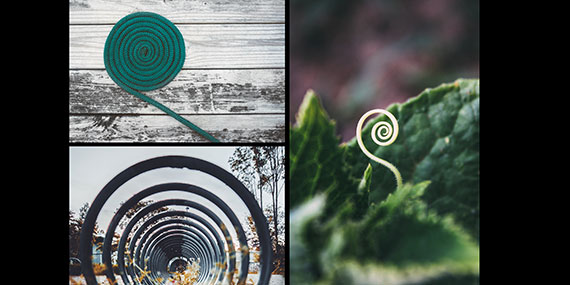
Top left photo by Matt Hagerty, Bottom left photo by Lorenzo Hamers, Right photo by Bogomil Mihaylov
Key Thought: You’ve probably heard of the Fibonacci Sequence. You know – Pi and the Golden Ratio. That idea is best left for another blog post. The reality is that any spiral has the potential to create an exciting and fun photo!
Skill Points:
- Spirals are found everywhere in nature. However, you may need to get down on your hands and knees to spot them!
- When photographing your spiral, make sure that it contrasts from the background either by tone or color.
- The best lighting to capture a spiral shape is either sidelight or backlight. Don’t use front lighting unless you are using multiple light sources.
- Combining a spiral, or spirals, with other shapes or materials can create interesting juxtapositions.
- Creating your own spiral out of materials easily found around the home can open up your creativity to an entirely new level. The possibilities are endless.
- History has proven that the human mind has a unique attraction to the spiral shape. Including a single spiral or more than one spiral within your photo, virtually guarantees added attention.
- When you’re out and about, you will find spirals everywhere, especially in architecture and other forms of art such as sculptures. Be on the lookout.
Idea: You can easily create a spiral by attaching a flashlight to a string and swinging it in a circle while standing in a darkened area.
Photo by Mitchell
How to Make a Light Spiral:
- Locate a dark area. This could be outdoors or inside a room. If you’re outdoors, look around for other light sources that might affect your picture. You could get creative and include those light sources, or you could exclude them and just go for the spiral. If you choose an indoor spot, make sure you have enough space. You don’t want to hit anything with your twirling flashlight.
- Use a small, lightweight flashlight to start. As you gain skills, you can try different kinds of lights and mix them up in the same picture. Tie the rear of the flashlight to a sturdy string.
- With the lights on, swing the flashlight around for some practice.
- To create a spiral, you’ll have to do one or both of two things as you twirl the flashlight. Increase, or decrease, the size of the arc while swinging the flashlight. And/or move closer or away from the camera as you rotate the light during the exposure.
- To vary the size of the arc, loosely hold the string in one hand close to the flashlight, and then firmly grab the line with the other hand (2 to 3 feet from the flashlight). As you twirl the light, move the loose hand forward or backward along the string. This will change the diameter of the arc. It might take a little practice.
- Try changing the diameter of the arc and also moving forward or backward with your feet at the same time.
- Set your camera up on a sturdy surface, preferably a tripod.
- Set the shooting mode to manual.
- Set the aperture to f/5.6.
- Set the shutter speed to bulb or the most extended shutter speed that your camera allows (it should be at least 15 to 30 seconds).
- Use either the self-timer, a cable release, or an electronic remote release to fire the shutter.
- Start with an ISO of 800. Note: Depending upon the illumination level of your light source, you may have to adjust either the ISO or the aperture.
- Set the camera focus to manual and manually focus on an object located where you will stand while swinging your flashlight.
- With your shooting location darkened, turn on the flashlight and let it hang on the string. Begin twirling it in a circle. Remember: you have to vary the size of the circular arc and/or change your camera to subject distance to create a spiral. Otherwise, you will simply record a circle.