| Greetings fellow photographer, What is the color black? It seems like that should be a relatively easy question to answer. However, it’s not – especially when it comes to black and white photography. |
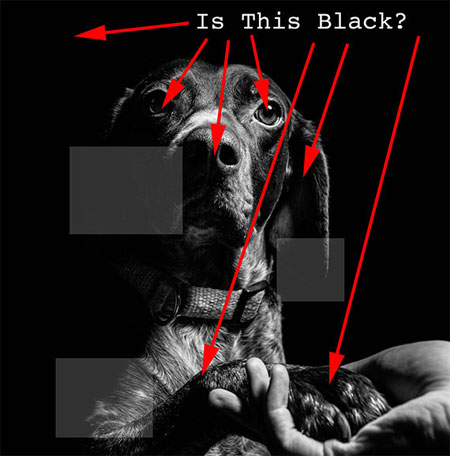 |
| There are infinite shades of color and tone all around us. Our brain, through the help of our eyes, categorizes and identifies each object that we view. We look at an object and say, “Oh, that’s black.” The truth is that there are infinite shades and tones of the color black. The cute picture of the dog illustrates this idea. What’s black in that picture? Are all of those points at the tip of the red arrows the color black? Yes, they are, and that brings up a critical concept in black and white photography. This concept is known as the Black Point. If you take a moment and look at the three gray boxes in the puppy photo, you’ll see that there are areas of the dog’s ear, face, and leg that have disappeared into the background. They have quite literally melted away. This can mean that the Black Point was not appropriately placed, and in this case, I would say that was true. |
 |
| In this second example photo, the woman’s head, neck, and shoulders disappear into the background. The difference is that in this case, it was intentional for effect. Knowing how to place your Black Point is a valuable skill in photography (particularly for black and white photography)! Let’s Define Black Point The Black Point is the darkest and most dense black area of your photograph. On a histogram, it’s located to the very far left of the scale. When you read that area with an RGB eyedropper, it reads 0,0,0. The below photograph is a superb example of a well-placed Black Point. This woman is literally covered in black. Yet notice how you can see detail and texture in her blouse, hair, on the camera, and even under the hat. Where is the Black Point in this picture? |
 |
| A well-placed Black Point is typically located in a non-significant shadow area within the frame. Here’s Today’s Quick Tip: Black Point is vital to your photography, especially black and white photography, as it helps to ensure that you have a full range of tone within your picture! You place the Black Point by carefully watching the histogram as you convert a digital color file to a black and white photograph. Once you’ve made the conversion, you can further fine tune the Black Point with the Adjustment Brush and/or the Lightroom sliders labeled Shadows and Blacks. For further training, you may want to study a few examples from this popular eBook on mastering B&W Photography which just went on sale today. Until next time, try converting one of your photos to black and white and placing the black point in the best spot. Sent with 💌 from PictureCorrect |
by Chris Kenyon on 7 April 2024